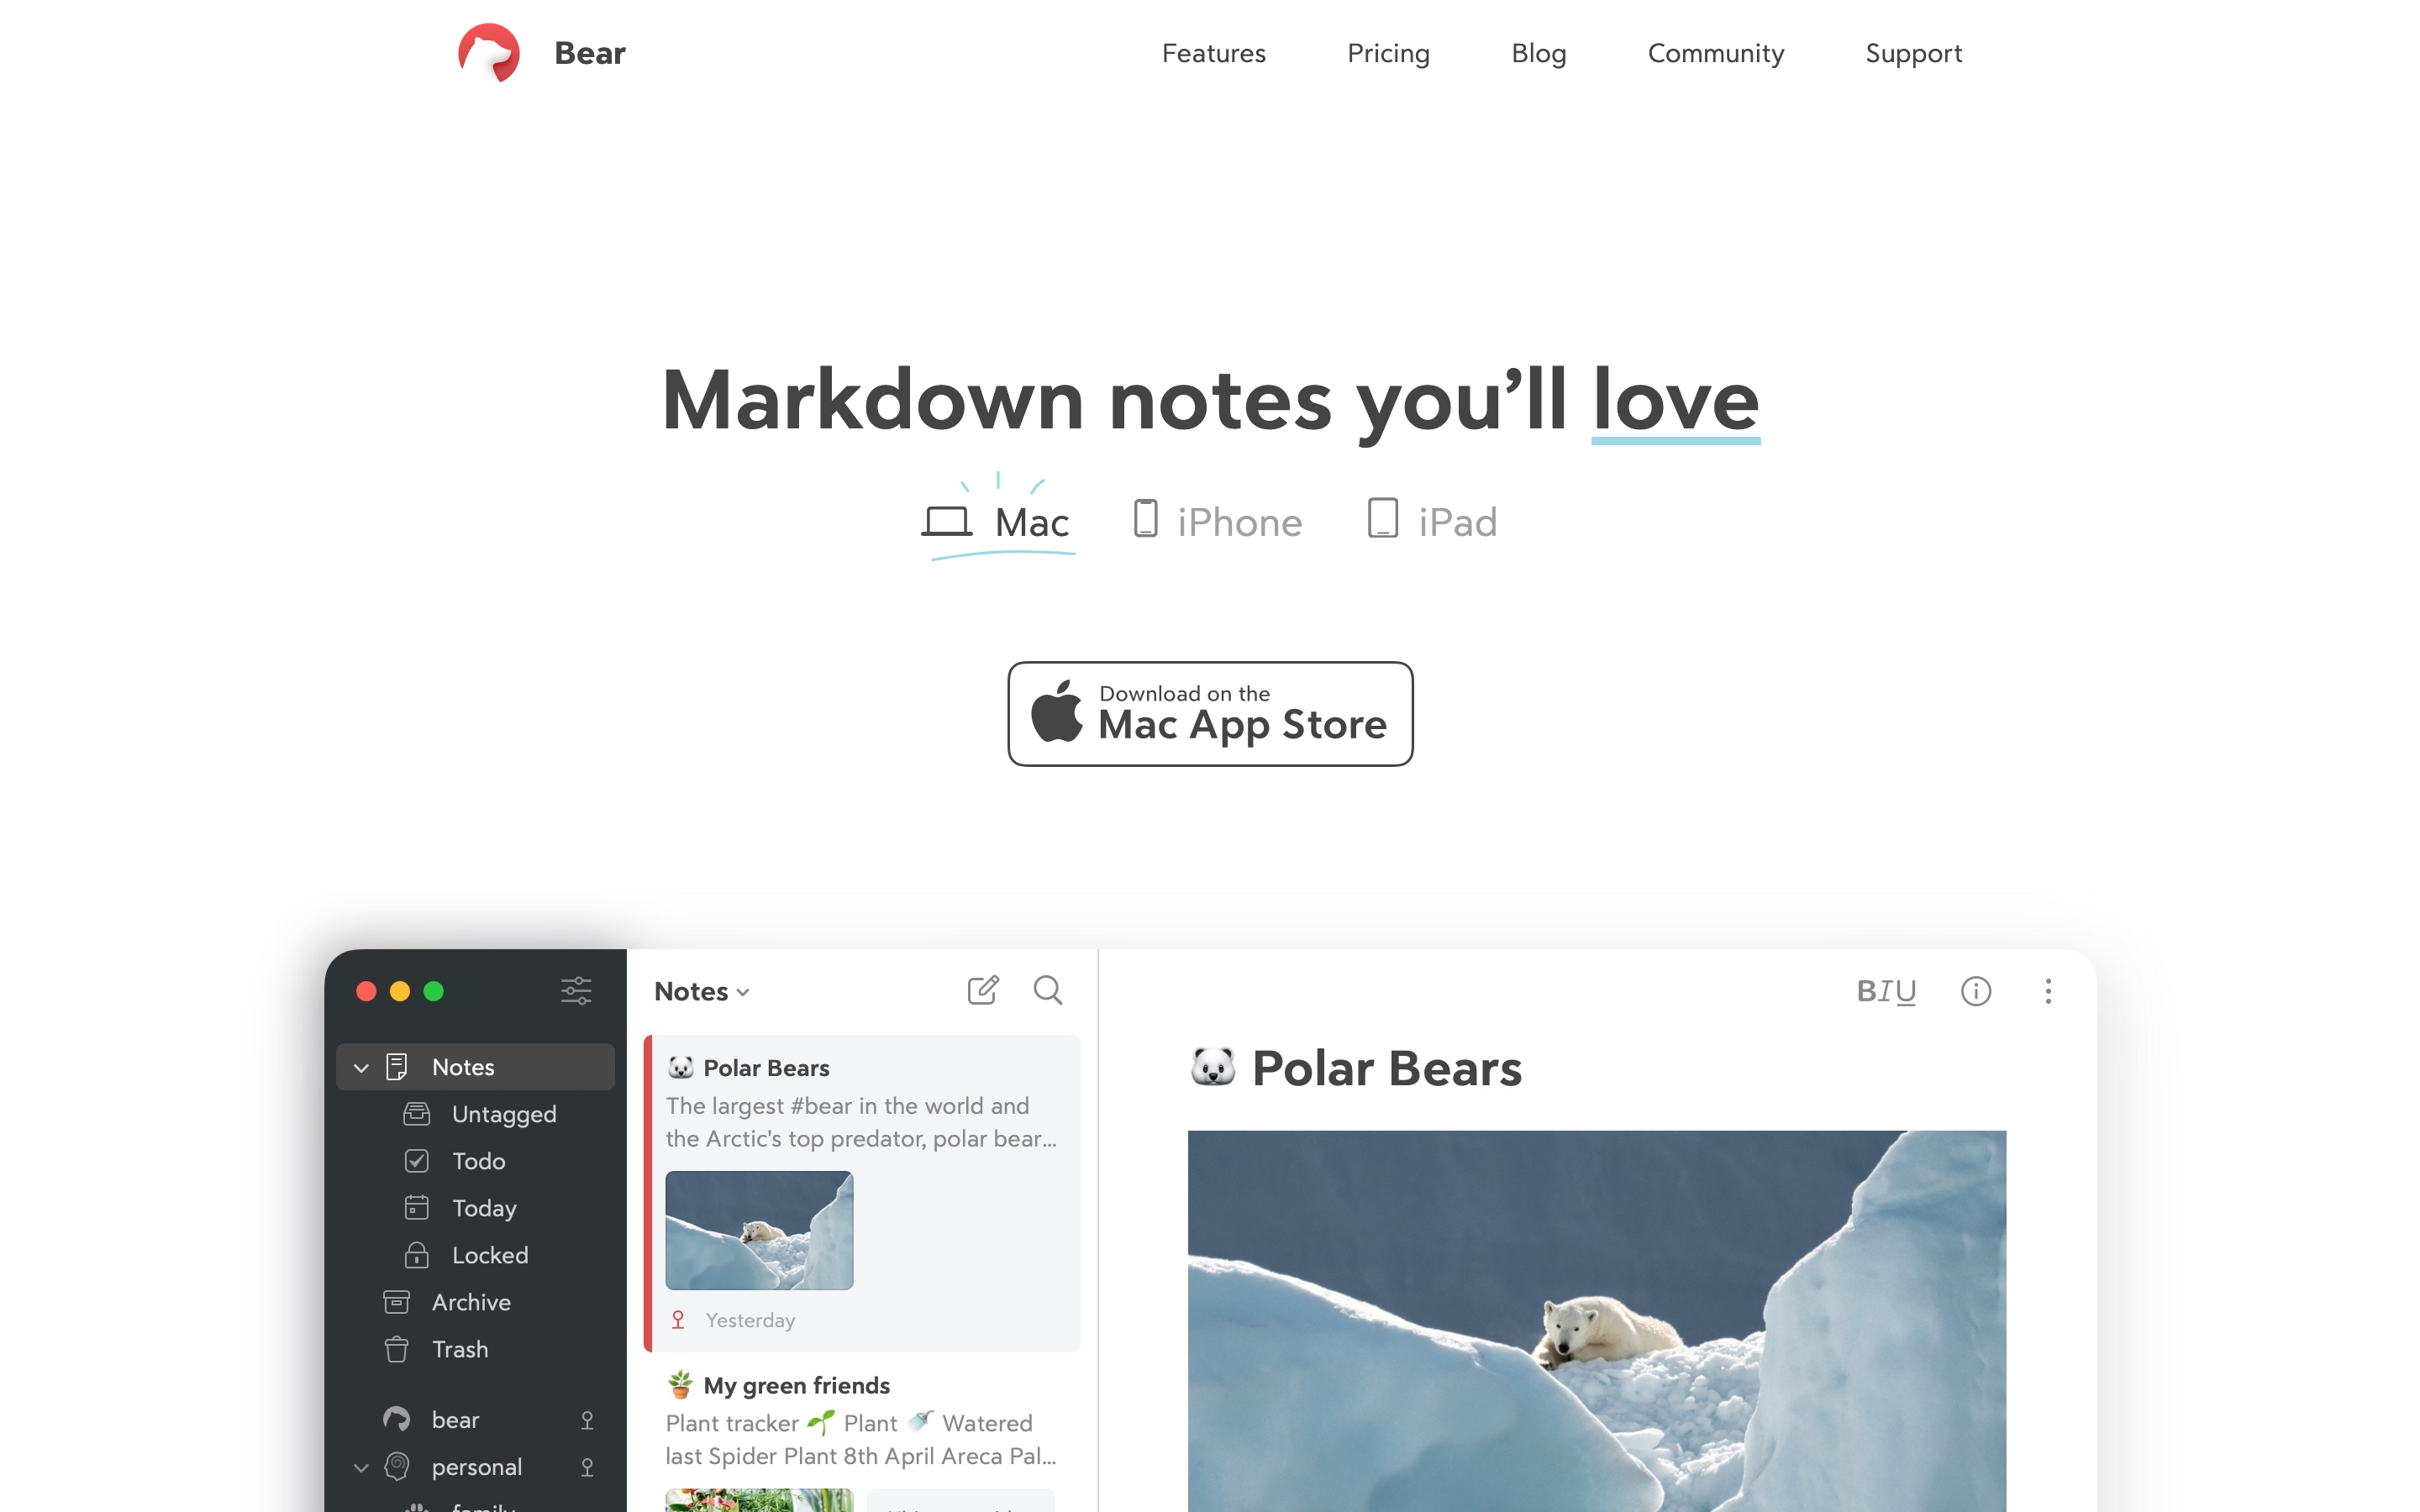
Bear: 排版優先的寫作
Bear以排版優先的設計贏得Apple Design Award:巢狀標籤、主題系統、專注模式和內嵌Markdown。附Swift程式碼。
「使用 Bear 時,你會感覺自己又在使用一台真正的 Apple 電腦。沒有轉圈圈、沒有骨架載入畫面、沒有彈出訊息。只有流暢的動畫和隨時待命的內容。」
Bear 是無干擾設計的典範之作。從排版到標籤系統,每一個決策都是為了服務那些想要專注思考、而非管理工具的寫作者。
重點摘要
- 零載入狀態 - 內容隨時就緒;同步在背景無聲進行
- 標籤取代資料夾 - 寫作時直接輸入
#tags比事後整理資料夾更高效,而且筆記可以同時存在於多個位置 - 排版控制尊重讀者 - 字型、大小、行高和寬度的控制讓使用者能針對自己的閱讀習慣進行最佳化
- 一次切換所有主題 - 28 種以上精心設計的主題勝過零散的顏色選擇器
- 專注模式作為逃生艙 - 當無干擾還不夠時,一個手勢就能移除所有介面元素
為什麼 Bear 值得關注
Bear 榮獲 2017 年 Apple Design Award 及多次編輯精選獎,證明了筆記應用程式可以同時兼具強大功能與優美設計。
主要成就: - 讓非開發者也能輕鬆使用 Markdown - 發明了巢狀標籤作為資料夾的靈活替代方案 - 創建了 28 種以上適合不同寫作情境的主題 - 設計了 OLED 專用主題(Dieci)實現真正的純黑 - 零載入狀態:內容隨時就緒
核心設計理念
反摩擦原則
Bear 移除了思緒與文字之間的每一個障礙:
摩擦模式(其他應用程式)              BEAR 的做法
───────────────────────────────────────────────────────────────────
建立前要選擇資料夾                    直接開始打字
格式工具列擋住視線                    Markdown 內嵌,隱形存在
同步轉圈打斷思路                      背景同步,沒有指示器
設定散落在各處選單                    排版控制隨時可及
用顏色選擇器來標記重點                主題一次改變所有顏色
關鍵洞察:每一個 UI 元素都是潛在的干擾。盡可能移除它們。
設計模式庫
1. 無限巢狀標籤
Bear 的標籤系統以靈活的內嵌式組織取代了僵化的資料夾層級結構。
傳統資料夾 vs Bear 標籤:
資料夾方式                            BEAR 的標籤方式
───────────────────────────────────────────────────────────────────
📁 Work                               筆記包含:#work/meetings
├── 📁 Meetings                       筆記包含:#work/meetings/q1
│   ├── 📁 Q1
│   │   └── standup-2025-01.md       一則筆記可以有多個標籤:
│   └── 📁 Q2                         #work/meetings #action-items #q1
└── 📁 Projects

單一位置                              多個位置(虛擬的)
移動 = 檔案操作                       標籤 = 直接輸入
在檔案瀏覽器中可見                    在側邊欄 + 筆記內文中可見
標籤語法:
單一標籤:     #ideas
巢狀標籤:     #work/meetings/2025
深層巢狀:     #journal/2025/01/17

側邊欄呈現:
├─ 📁 work
│   └─ 📁 meetings
│       └─ 📄 2025
├─ 📁 journal
│   └─ 📁 2025
│       └─ 📁 01
│           └─ 📄 17
關鍵洞察:標籤是在行內直接輸入,而非從選單中選取。寫作的過程本身就在建立組織結構。
2. 排版控制系統
Bear 提供了其他筆記應用程式所隱藏的精細排版控制:
┌─ 排版設定 ─────────────────────────────────────────────────────────┐
│                                                                    │
│  字型                                                              │
│  [Avenir Next ▼]        ← 系統字型 + 自訂字型                      │
│                                                                    │
│  大小                                                              │
│  [─────●────────]  16pt                                           │
│                                                                    │
│  行高                                                              │
│  [────────●─────]  1.6                                            │
│                                                                    │
│  行寬                                                              │
│  [──●───────────]  窄      ← 最佳閱讀寬度                          │
│                                                                    │
│  段落間距                                                          │
│  [─────●────────]  中等                                           │
│                                                                    │
└────────────────────────────────────────────────────────────────────┘
Swift 實作方式:
struct TypographySettings: Codable {
    var fontName: String = "Avenir Next"
    var fontSize: CGFloat = 16
    var lineHeightMultiple: CGFloat = 1.6
    var lineWidth: LineWidth = .comfortable
    var paragraphSpacing: CGFloat = 12

    enum LineWidth: String, Codable {
        case narrow = "narrow"      // ~60 characters
        case comfortable = "medium" // ~75 characters
        case wide = "wide"          // Full width
    }
}

// Applied to editor
func applyTypography(_ settings: TypographySettings, to textView: UITextView) {
    let style = NSMutableParagraphStyle()
    style.lineHeightMultiple = settings.lineHeightMultiple
    style.paragraphSpacing = settings.paragraphSpacing

    let attributes: [NSAttributedString.Key: Any] = [
        .font: UIFont(name: settings.fontName, size: settings.fontSize)!,
        .paragraphStyle: style
    ]

    textView.typingAttributes = attributes
}
3. 主題系統
Bear 的主題會一次影響所有元素——不需要零散地選擇顏色。
主題結構:
struct BearTheme {
    // Background layers
    let sidebarBackground: Color
    let noteListBackground: Color
    let editorBackground: Color

    // Text hierarchy
    let textPrimary: Color
    let textSecondary: Color
    let textMuted: Color

    // Semantic highlights
    let tagColor: Color
    let linkColor: Color
    let codeBackground: Color
    let headingColor: Color

    // Selection and focus
    let selectionColor: Color
    let cursorColor: Color
}

// Example: Red Graphite (default light theme)
let redGraphite = BearTheme(
    sidebarBackground: Color(hex: "#F7F7F7"),
    noteListBackground: Color(hex: "#FFFFFF"),
    editorBackground: Color(hex: "#FFFFFF"),
    textPrimary: Color(hex: "#333333"),
    textSecondary: Color(hex: "#888888"),
    textMuted: Color(hex: "#BBBBBB"),
    tagColor: Color(hex: "#D14C3E"),      // The signature red
    linkColor: Color(hex: "#B44B41"),
    codeBackground: Color(hex: "#F5F5F5"),
    headingColor: Color(hex: "#333333"),
    selectionColor: Color(hex: "#FFE4E1"),
    cursorColor: Color(hex: "#D14C3E")
)

// Example: Dieci (OLED-optimized)
let dieci = BearTheme(
    sidebarBackground: Color(hex: "#000000"),  // True black
    noteListBackground: Color(hex: "#000000"), // True black
    editorBackground: Color(hex: "#000000"),   // True black
    textPrimary: Color(hex: "#FFFFFF"),
    textSecondary: Color(hex: "#888888"),
    textMuted: Color(hex: "#555555"),
    tagColor: Color(hex: "#FF9500"),
    linkColor: Color(hex: "#FF9500"),
    codeBackground: Color(hex: "#1C1C1C"),
    headingColor: Color(hex: "#FFFFFF"),
    selectionColor: Color(hex: "#3A3A3C"),
    cursorColor: Color(hex: "#FF9500")
)
主題分類: - 淺色主題:Red Graphite、High Contrast、Solarized Light - 深色主題:Dark Graphite、Dracula、Nord - OLED 主題:Dieci、Charcoal(純黑色以節省電量) - 特殊主題:Shibuya Jazz、Everforest(特定氛圍)
4. 專注模式
Bear 的專注模式移除一切干擾,只留下文字——就連游標也變得不顯眼。
一般模式
┌────────┬────────────┬───────────────────────────────────────────┐
│        │            │                                           │
│側邊欄   │ 筆記列表    │  編輯器                                    │
│        │            │                                           │
│ #work  │  Meeting   │  # Meeting Notes                          │
│ #ideas │  Ideas     │                                           │
│ #books │  Draft     │  Today we discussed...                    │
│        │            │                                           │
└────────┴────────────┴───────────────────────────────────────────┘

專注模式(鍵盤快捷鍵或滑動手勢)
┌─────────────────────────────────────────────────────────────────┐
│                                                                 │
│                                                                 │
│                   # Meeting Notes                               │
│                                                                 │
│                   Today we discussed...                         │
│                                                                 │
│                                                                 │
│                                                                 │
└─────────────────────────────────────────────────────────────────┘

一切消失。只剩文字。
實作原則: - 單一手勢或快捷鍵觸發 - 動畫快速(不拖泥帶水) - 游標輕微閃爍,不搶奪注意力 - 邊距為文字周圍提供呼吸空間
5. TagCons(視覺化標籤圖示)
Bear 會自動為常見標籤指派圖示,讓側邊欄一目瞭然。
帶有 TagCons 的側邊欄:
├─ 💡 ideas
├─ 📚 books
├─ ✏️ writing
├─ 📝 journal
├─ 🏃 fitness
├─ 💼 work
│   ├─ 📅 meetings
│   └─ 📋 projects
└─ 🎯 goals
圖示指派邏輯:
enum TagConCategory {
    static let mappings: [String: String] = [
        "ideas": "💡",
        "books": "📚",
        "reading": "📖",
        "writing": "✏️",
        "journal": "📝",
        "diary": "📓",
        "work": "💼",
        "meetings": "📅",
        "projects": "📋",
        "goals": "🎯",
        "fitness": "🏃",
        "health": "❤️",
        "recipes": "🍳",
        "travel": "✈️",
        "music": "🎵",
        "code": "💻",
    ]

    static func icon(for tag: String) -> String? {
        let normalized = tag.lowercased()
        return mappings[normalized]
    }
}
核心洞察:圖示自動指派但可自訂。智慧預設值降低設定門檻。
視覺設計系統
色彩調色盤(Red Graphite 主題)
extension Color {
    // Signature accent
    static let bearRed = Color(hex: "#D14C3E")

    // Backgrounds
    static let sidebarBg = Color(hex: "#F7F7F7")
    static let editorBg = Color(hex: "#FFFFFF")

    // Text
    static let textPrimary = Color(hex: "#333333")
    static let textSecondary = Color(hex: "#888888")

    // Code blocks
    static let codeBg = Color(hex: "#F5F5F5")
    static let codeText = Color(hex: "#333333")
}
字體排版
struct BearTypography {
    // Editor fonts
    static let bodyFont = Font.custom("Avenir Next", size: 16)
    static let headingFont = Font.custom("Avenir Next", size: 24).weight(.semibold)
    static let monoFont = Font.custom("SF Mono", size: 14)

    // Line heights
    static let bodyLineHeight: CGFloat = 1.6
    static let headingLineHeight: CGFloat = 1.3

    // Optimal reading width
    static let maxLineWidth: CGFloat = 680  // ~75 characters
}
動畫哲學
零載入狀態
Bear 的核心動畫原則:內容永遠準備就緒。
// Anti-pattern: Loading spinner
struct LoadingNote: View {
    var body: some View {
        ProgressView()  // Bear NEVER does this
    }
}

// Bear's approach: Optimistic, instant
struct NoteEditor: View {
    @State private var note: Note

    var body: some View {
        TextEditor(text: $note.content)
            .onAppear {
                // Content already available from local cache
                // Sync happens invisibly in background
            }
    }
}
流暢的面板轉場
// Sidebar collapse/expand
withAnimation(.spring(response: 0.3, dampingFraction: 0.8)) {
    sidebarVisible.toggle()
}

// Focus mode transition
withAnimation(.easeInOut(duration: 0.2)) {
    focusMode = true
}
Markdown 體驗
即時預覽(行內樣式)
Bear 在您輸入的同時即時渲染 Markdown,無需分割視窗。
What you type:              What you see:
───────────────────────────────────────────────────────
# Heading                   Heading (large, bold)

**bold text**               bold text (styled, ** hidden)

- list item                 • list item (bullet rendered)

`code`                      code (monospace, highlighted)

[link](url)                 link (styled, URL hidden)
實作概念:
class MarkdownTextStorage: NSTextStorage {
    private var backingStore = NSMutableAttributedString()

    override func replaceCharacters(in range: NSRange, with str: String) {
        beginEditing()
        backingStore.replaceCharacters(in: range, with: str)
        edited(.editedCharacters, range: range, changeInLength: str.count - range.length)
        endEditing()
    }

    override func processEditing() {
        super.processEditing()
        applyMarkdownStyling()
    }

    private func applyMarkdownStyling() {
        // Apply styles based on Markdown patterns
        // Hide syntax characters (**, `, #, etc.)
        // Render inline while preserving plain text source
    }
}
對我們工作的啟發
1. 零載入狀態
如果內容存在於本地端,立即顯示。同步在背景進行。
2. 標籤優於資料夾
寫作時的行內標記比事後的資料夾管理更快速。
3. 字體排版即是使用者體驗
讓使用者控制字型、大小、行高和寬度,展現了對閱讀體驗的尊重。
4. 一次主題化所有元素
別讓使用者挑選 12 種顏色。策劃完整的主題方案。
5. 專注模式作為逃生艙口
當無干擾模式還不夠無干擾時,一個手勢就能移除所有介面元素。
常見問題
Bear 的巢狀標籤如何運作?
在筆記中的任何位置輸入 #parent/child/grandchild。Bear 會自動在側邊欄建立層級結構。與資料夾不同,一則筆記可以有多個標籤,同時存在於多個「位置」。標籤是透過輸入來建立的,而非透過導覽選單。
為什麼 Bear 使用主題而非個別顏色設定?
主題確保視覺一致性。當使用者個別挑選顏色時,往往會創造出對比度不佳或色調衝突的組合。Bear 的 28 多種精選主題保證所有 UI 元素都有可讀、美觀一致的配色方案。
Bear 的 Markdown 與其他編輯器有何不同?
Bear 在您輸入時即時渲染 Markdown。語法字元(**、#、反引號)在輸入後會隱藏,只顯示樣式化的結果。您在編輯時就能看到最終外觀,無需另開預覽面板。
Bear 如何實現零載入狀態?
Bear 將所有內容儲存在本地端,並從快取即時載入。iCloud 同步在背景進行,沒有轉圈圖示或進度指示器。如果您在離線狀態下開啟 Bear,一切都能正常運作。當連線恢復時,同步會靜默完成。
我可以將 Bear 筆記匯出成其他格式嗎?
Bear 可匯出為 Markdown、PDF、HTML、DOCX 和純文字。筆記保留其 Markdown 原始碼,所以您擁有自己的資料。標籤系統會根據格式匯出為 frontmatter 或檔案結構。